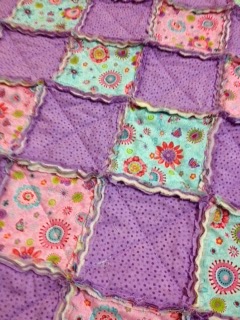
Wow! Just finished my very first rag rug and I think I might be hooked.
Now you must understand, I'm a bit of a fussy quilter. I like things to measure right, sit right and fit together right. I'm all about clean lines. But working for
BlanketLovez gives me the opportunity to do a little experimentation from time to time. The rag rug is something I've always wanted to try but it wasn't terribly high on my list. I'm certainly glad I did try it. I'll admit initially I thought it was something I could just 'whip' together in a jiffy.... ahhhh WRONG! You know, sandwiching the batting between the back and the front at the beginning saves you all that quilting at the end.... ummm well, sorry to tell you, it takes just as long as any other quilt made the traditional way. And all that clipping of seam allowances at the end... oh my, what a pain! Nevertheless, it was truly worth it, the results are impressive. AND, this is the part I love, it uses up all those pesky offcuts of batting! Bonus! Next time I think I will try making one out of flannel fabrics, I think the softness would be divine.
My starting point was
here. I found these instructions to be very helpful but there are a few things I would do differently in hindsight.
So here we go. I will put up my version of instructions here and later add them as a tutorial on separate page in the side bar. Bear in mind, I do assume you have a basic knowledge of quilting and sewing on binding.
First, if you are using leftover scraps of batting, this will most likely determine your block size. I cut my batting into 5" squares. Remember you can sew smaller pieces of batting together to make a wider piece. Simply cut straight edges, which you butt together and, using a zig zag stitch and a walking foot, simple sew together. You may get a few more blocks out of this.
Next, you can use either cotton quilting fabrics (as I did) or flannel fabrics. Cut your fabric blocks 1/2 to 1" larger than the wadding blocks. In my quilt I cut them 1/2" larger at 5 1/2" but I think next time I would cut them 6". The raggy edges is what gives the rag rug its cuddly look so I think you want to enhance that feature. Of course its just personal preference.
Of course you need twice as many fabric squares as you think because you are doing the front and back of the quilt at the same time. Your backing squares may be the same as the front or different, entirely up to you.
To layer, place your backing piece wrong side up, centre the wadding on top,
the place front piece right side up and pin together. These mini quilt pieces are going to join together to make the large quilt.
Next step is to quilt them so they hold together. Using a walking foot (highly recommended to stop the layers shifting as you sew but you can do it with a normal foot if necessary) and matching thread, sew a line across the block diagonally, from one corner to the other. I found it quickest to chain piece them.
Clip them apart and then sew diagonally across the way so that you create a quilted X across each block.
Place them in their final arrangement on the floor, ready to sew your rows.
Separate into rows and start by sewing the blocks together with BACKING SIDES TOGETHER using a seam allowance equivalent to the difference in size from your wadding to your fabric squares. My wadding was 5" and my fabric squares 5 1/2" which only left 1/4" for the seam allowance. That is something I would do differently next time. After sewing one seam together, I soon realised I was leaving myself very short for the rag rug look. So I increased my seam allowance to 1/2". Much better. In hindsight, I would have cut my fabric at 6" square then I would have had 1/2" for my seam allowances. To be honest, this quilt isn't all that fussy and you can get away with a bit of play. I do have a bit of wadding coming through my seam allowances and maybe thats what makes them sit up nicely. Have a play and see what you think.
Now if you've done quite a bit of quilting in the past, old habits die hard and you will find yourself automatically putting front pieces together. Remember that we want the seam allowances on the front so, when sewing two blocks together, sew with the backing sides facing each other.
Once the rows are made, start joining the rows in the same way, backing sides facing each other and when you get to the seam intersections, open them up. I think the best explanation of this is from the
site I referred to earlier. The seams need to match (as you would normally do) but seams need to be open on the top and the bottom pieces. I think this pic (from the above mentioned site) says it all.
Ok so you have your rag rug together, and its truly looking like an old rag lol. At this point, I was wondering what I had wasted my good fabric on. Was this really going to work???? Rest assured it will look better than this. You've come this far so lets push on. It starts to make real progress from here.
Now, I decided to bind my quilt but you don't have to, you can sew a line around the outside of the quilt 1/2" from the outer edge and clip it (as shown below) like the other seam allowances. I quite like binding, I think it finishes off a quilt nicely. I cut my binding at 3" (which is then folded and pressed in half) and attached in the usual way with a 1/2" seam allowance (opening up the seams on the edges so they lay flat).
Next up is the clipping. This looks easy, and it is, but its tiring. Grab some sharp pointed scissors and begin clipping the seam allowances about every 1/4 to 1/2" . This creates a lot of fluff and threads!
Once you've done that, throw into the washing machine, and then into the dryer until dry. The more you wash this quilt the softer and raggier it will get!
Before washing and drying.
After washing and drying.
This is the back... oh yes, those clean lines still appeal to me!
But of course, the best part is this.... Sharing the love <3
If you have any questions regarding the above, please feel free to leave a comment and I will endeavour to assist!
Until next time
Yours in Stitches
Leanne x