Thursday 22 May 2014

Rag Rug Success!

Wow!  Just finished my very first rag rug and I think I might be hooked.


Now you must understand, I'm a bit of a fussy quilter.  I like things to measure right, sit right and fit together right.  I'm all about clean lines.  But working for BlanketLovez gives me the opportunity to do a little experimentation from time to time.  The rag rug is something I've always wanted to try but it wasn't terribly high on my list.  I'm certainly glad I did try it.  I'll admit initially I thought it was something I could just 'whip' together in a jiffy.... ahhhh WRONG!  You know, sandwiching the batting between the back and the front at the beginning saves you all that quilting at the end.... ummm well, sorry to tell you, it takes just as long as any other quilt made the traditional way.  And all that clipping of seam allowances at the end... oh my, what a pain!  Nevertheless, it was truly worth it, the results are impressive.  AND, this is the part I love, it uses up all those pesky offcuts of batting!  Bonus!  Next time I think I will try making one out of flannel fabrics, I think the softness would be divine.

My starting point was here.  I found these instructions to be very helpful but there are a few things I would do differently in hindsight.

So here we go.  I will put up my version of instructions here and later add them as a tutorial on separate page in the side bar.  Bear in mind, I do assume you have a basic knowledge of quilting and sewing on binding.

First, if you are using leftover scraps of batting, this will most likely determine your block size.  I cut my batting into 5" squares.  Remember you can sew smaller pieces of batting together to make a wider piece.  Simply cut straight edges, which you butt together and, using a zig zag stitch and a walking foot, simple sew together.  You may get a few more blocks out of this.

Next, you can use either cotton quilting fabrics (as I did) or flannel fabrics.  Cut your fabric blocks 1/2 to 1" larger than the wadding blocks.  In my quilt I cut them 1/2" larger at 5 1/2" but I think next time I would cut them 6".  The raggy edges is what gives the rag rug its cuddly look so I think you want to enhance that feature.  Of course its just personal preference.


Of course you need twice as many fabric squares as you think because you are doing the front and back of the quilt at the same time.  Your backing squares may be the same as the front or different, entirely up to you.


To layer, place your backing piece wrong side up, centre the wadding on top,


the place front piece right side up and pin together.  These mini quilt pieces are going to join together to make the large quilt.


Next step is to quilt them so they hold together.  Using a walking foot (highly recommended to stop the layers shifting as you sew but you can do it with a normal foot if necessary)  and matching thread, sew a line across the block diagonally, from one corner to the other.  I found it quickest to chain piece them.


Clip them apart and then sew diagonally across the way so that you create a quilted X across each block.


Place them in their final arrangement on the floor, ready to sew your rows.


Separate into rows and start by sewing the blocks together with BACKING SIDES TOGETHER using a seam allowance equivalent to the difference in size from your wadding to your fabric squares.  My wadding was 5" and my fabric squares 5 1/2" which only left 1/4" for the seam allowance.  That is something I would do differently next time.  After sewing one seam together, I soon realised I was leaving myself very short for the rag rug look.  So I increased my seam allowance to 1/2".  Much better.  In hindsight, I would have cut my fabric at 6" square then I would have had 1/2" for my seam allowances.  To be honest, this quilt isn't all that fussy and you can get away with a bit of play.  I do have a bit of wadding coming through my seam allowances and maybe thats what makes them sit up nicely.  Have a play and see what you think.


Now if you've done quite a bit of quilting in the past, old habits die hard and you will find yourself automatically putting front pieces together.  Remember that we want the seam allowances on the front so, when sewing two blocks together, sew with the backing sides facing each other.

Once the rows are made, start joining the rows in the same way, backing sides facing each other and when you get to the seam intersections, open them up.  I think the best explanation of this is from the site I referred to earlier.  The seams need to match (as you would normally do) but seams need to be open on the top and the bottom pieces.  I think this pic (from the above mentioned site) says it all.


 Ok so you have your rag rug together, and its truly looking like an old rag lol.  At this point, I was wondering what I had wasted my good fabric on.  Was this really going to work???? Rest assured it will look better than this.  You've come this far so lets push on.  It starts to make real progress from here.

Now, I decided to bind my quilt but you don't have to, you can sew a line around the outside of the quilt 1/2" from the outer edge and clip it (as shown below) like the other seam allowances.  I quite like binding, I think it finishes off a quilt nicely.  I cut my binding at 3" (which is then folded and pressed in half) and attached in the usual way with a 1/2" seam allowance (opening up the seams on the edges so they lay flat).

Next up is the clipping.  This looks easy, and it is, but its tiring.  Grab some sharp pointed scissors and begin clipping the seam allowances about every 1/4 to 1/2" .  This creates a lot of fluff and threads!


Once you've done that, throw into the washing machine, and then into the dryer until dry.  The more you wash this quilt the softer and raggier it will get!

Before washing and drying.


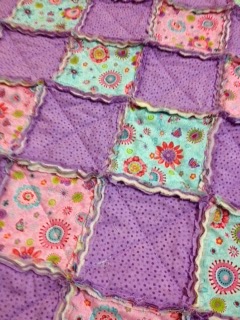
After washing and drying.


This is the back... oh yes, those clean lines still appeal to me!


But of course, the best part is this.... Sharing the love  <3


If you have any questions regarding the above, please feel free to leave a comment and I will endeavour to assist!

Until next time

Yours in Stitches

Leanne x

Tuesday 20 May 2014

Sew Sew Sew

Hello lovelies, oh I have been busy!  After submitting my assignment just before the weekend (sooooo glad thats done) I have been sewing to my hearts content.  I have fallen madly in love with this quilt by Bonnie Hunter called Wonky Wishes.  


I decided to dig out all the old, tired fabrics from my stash and start using them up.  I used to love country fabrics and colours but in more recent times have moved on to a brighter, fresher palette.  So gradually the oldies are getting cut up into 2.5" squares and then 1.5", 2" and 2.5" strips for other upcoming projects.  If your not familiar with Bonnie Hunter, her site is here and she, in my books, is the worlds greatest scrap quilter!  I just adore her designs and her passion for all things quilted.  There are tonnes of free patterns on Bonnie's site and oodles of free tutorials.  She has even written a few books and now spends a great deal of her time touring the US and overseas holding workshops.  I just love her frugal ways.  Not a scrap of fabric gets wasted, and from following her ideas, I started using the Scrap Users System and the Leaders and Enders concept.  Absolutely brilliant and yet so simple you'll wonder why you didn't think of it.

Anyhoo, here is my progress on Wonky Wishes:


Not a great pic because the sun was coming through the window (but you aren't going to hear me complaining about sunshine in Melbourne lol) they are so much fun and I am definitely chewing through a lot of my old fabrics.

I also got inspired to have a go at making my first rag rug quilt from this tutorial, and hope to finish it by the end of the week.


This one is for the BlanketLovez charity, of which I am the co-ordinator for Melbourne.  So far its been a lot of fun, fairly easy, and I can't wait to see how it turns out once its washed and dried and the seam allowances fluff up a bit.

As for this project, I'm still working on it.  But hope to finish it off soon so I can post the instructions for you all.  I still think there is a better way to make the leaves so they are a little more durable.


But for now this is how it is.  I just need to quilt the front and make the cushion backing.

Lastly, I do apologise for these hazy photos, they are taken on my iPhone so the resolution isn't great. I've just ordered a new camera that takes higher resolution pics and videos which is very exciting and means I can start producing my patterns and post some online videos of quilting tutorials.

Till next time

Yours in stitches

Leanne x

Wednesday 14 May 2014

Time for tea

I've had a lovely couple of days, busy but just lovely.  Firstly, Mother's Day, or Mother's Day Weekend as I have now renamed it (one day was never enough to honour me lol) started on Saturday with homemade waffles for breakfast and lunch at a local pasta restaurant.


Then Sunday, with bacon and eggs served in bed by DH and a few little visitors bearing gifts of all sorts: cabled scarf, football scarf, teddy bear mug, slippers and a sweet little notepad.  We headed off to the countryside to visit my Mum and Dad mid morning and had homemade pumpkin soup for lunch followed homemade coffee flavoured ice-cream and lounging about catching up on this and that.  Very relaxing!

Monday came before I knew it and so time to get back to being busy.  Currently I am studying to become a certified bookkeeper and so there is homework to be done, and assignments to be submitted.  I severely underestimated the amount of work this course entails and each unit seems to drag on forever, but I am enjoying it and hope to be finished by the end of the year.

Yesterday I had a most enjoyable catch up with a couple of girlfriends.  Oh were we spoilt!  There is only three of us but this time the host put on a huge spread and this included SCONES!  Oh my... I love nothing more than a freshly baked scone with strawberry jam and whipped cream.  One of life's sheer delights.  Coupled with a hot cup of tea I can think of nothing better to enjoy in the afternoon before the hustle and bustle of school pickup.

My favourite scone recipe is Lemonade Scones.  A little messy to make I must confess, but light and fluffy and a real pleasure to eat.  Here is my version:


Lemonade Scones

3 Cups Self Raising flour
a pinch of salt
1 cup of lemonade
1 cup of thickened cream

Preheat oven to 220 C.

Sift dry ingredients into large mixing bowl and make a well in the centre.

Pour in the lemonade and cream and gently mix together with a knife.  Empty contents of bowl onto lightly floured bench top and knead very gently.

DO NOT over handle the dough.  You may need to sprinkle over a little flour whist kneading to prevent sticking. 

Cut 12 scones with cutter and place closely together on greased baking tray.

Bake 10-12 mins (longer if still doughy in the middle).

Serve with jam and cream.


The only other thing I like more than eating sweet treats is sewing.  I haven't been doing a lot, I must confess due to studying but I would like to give you a little sneak peak at something I've been working on.


You just never know when you start to experiment where a design will lead you.  It's not quite the look I'm after but I love it and it has lead me to experiment further with other ideas.  It's made using the selvages and strings from trimming/squaring up other projects so each fabric reminds me of the last time I used it.  I just love using up the scraps, its a very frugal project and the colours seem to sparkle against the white background.  It will be a cushion and I plan to finish it by the end of the week and put it up here as a free tutorial.

Also, this has been an ongoing work in progress for the past couple of years and is definitely a labour of love.


It's made of 1" paper pieced hexagons, hand sewn, and I believe the arrangement is called Grandma's Garden.  Typically, at the end of each day, my DH and I sit and catch up on a few TV series we are watching and I like to work on this.  It helps me wind down before bed and makes me feel I'm getting something done just for me.  Actually I have quite a few WIP's *oh the guilt* so have decided to add these on the sidebar to inspire me to finish them.  I can be so fickle sometimes jumping from one project to the next, as each one inspires me.  Why? Because I can! haha

Until next time

Yours in stitches

Leanne x

Tuesday 6 May 2014

Mother's Day... it's not too late to create!

Oh that one beautiful day of the year, Mother's Day, where all mothers are honoured, appreciated for all they do in keeping a family warm, happy, healthy and above all... loved.


In Australia, Mother's Day is just a hop, skip and jump away... the second Sunday each May... this Sunday 11th May.

Did your heart just skip a beat?  "WHAT! THIS SUNDAY??? ", I hear you screech, "but I was going to make this and now I won't have time... arghhhh".

Never fear, its not to late to make something simple and sweet.  So I've put together a few ideas for you.  Simple little projects from stuff you probably already have in your stash.


How about this cute little iPhone case by Cherry Heart,


this darling little fabric purse (which I'm dying to have a go at myself) by Flutter Kat, or


for the sewing mum, this little patchwork pin cushion or this rounded pincushion (made from a recycled tuna can!) from Crazy Mom Quilts.


There is zippered pouches and bags in every size, shape and form over here at Noodlehead,


and of course, the ever popular mug rug over here at Simply Notable.  Why not team it with a beautiful porcelain mug and her favourite tea or coffee?

Inspired yet?

Yours In Stitches

Leanne x

Monday 5 May 2014

Welcome to Crystalbrook Cottage!

Welcome to my little corner of the world.  My name is Leanne and I'm a mother to three beautiful kids (biased much!) and partner to the very handsome DH.  I love all things crafty but my greatest passion is quilting.

I've been meaning to start this blog for quite some time.  After many years I am restarting my business patchwork and quilting business, Crystalbrook Cottage.  I started this business a few years ago but found at the time, as a single parent, it wasn't bringing in as much income as I'd hoped and I went into full time employment, therefore not having time (sadly) to keep the business running.

During this time though I did learn a lot about running a small business, sold some patterns and even had a pattern published in my favourite quilting magazine, Homespun, which you can still access, called It's the Simple Things.


I am so glad to have the opportunity now to return to this business and make it into something even more special than before.  I hope to get back to designing patterns and selling products through my online shop (opening soon), and using this blog to provide a source of information and inspiration to fellow quilters.

I am also happy to report my recent title of Area Quilt Queen, Melbourne, for Australian charity BlanketLovez which distributes handmade quilts to sick and traumatised children.

Of course, I hope this blog will be so much more than just quilting... here I hope to share my daily life, my favourite things, recipes I make for my family, home making tips, family creations, interests and adventures.

Won't you come and join in our adventures?

Yours in Stitches

Leanne x